


How do you create a successful WordPress website? In addition to web design and functionality, you need to choose the right theme, install the right plugins, and make sure your site offers the best user experience as well as the website performance you might think about last. Want to know how to create an effective, efficient, and lightning-fast website?
There’s no doubt that website speed can have a significant impact on user experience, but the truth is, you don’t need a survey to tell you that people don’t like slow websites. You may find yourself waiting for the page to load and breaking seconds off because it’s just not worth your time.
In the modern world, slow loading speeds equal a poor user experience, and websites with poor user experience record high bounce rates. Also, Google is not very interested in filling the top of the results page with websites that users find useless. So if your site is slow, its search engine ranking will likely be very poor.
In other words, underperformance has the potential to impact the success and sustainability of your business, brand, or project. To stay ahead of the competition, you must constantly update, iterate and improve your website to ensure it runs at peak performance.
Online website speed tests examine loading speeds in detail to give you a more comprehensive picture of how well your site is performing. Some of the most popular platforms include:
They’re all free to use, and all you need to do is enter your domain name. These tools will connect to your website and analyze its performance. Some of them may load from different locations or even use multiple user agents, analyzing the performance of mobile devices and desktop computers.
We’re not saying that you should ignore the reports generated by website speed testing tools – they usually contain tons of valuable data and actionable tips to help speed up your site. However, not all of the suggestions will work for you. Some of these may require special development that is beyond your technical expertise. In other cases, applying the suggested solutions may not be possible.
You can just get affordable and easy-to-obtain hosting services provided by WordPress. However, they only work effectively if traffic levels are low and when you are just starting your website.
You can switch to an affordable VPS plan with multiple CPU cores and a few gigabytes of RAM. You’ll get the extra power you need without paying hundreds of dollars each month for expensive specialty machines. As your website gains more momentum, you can easily add more resources to your VPS and guarantee fast loading speeds even under heavy loads.
Virtual cloud servers are essentially infinitely scalable, and they give you a pay-as-you-go model that is unmatched by other forms of web hosting.
There’s no shortage of people trying to speed up their WordPress websites, and there’s no shortage of vendors coming up with caching plugins that can be installed in a matter of clicks. You can find dozens of solutions in the official WP plugin repository, and third-party websites offer many more options.
You’ll notice that add-ons come with different features and settings, so it’s up to you to sift through and choose the best solution that suits your project.
We have RomethemeKit. Plugins for Elementor are Addons for Elementor Page Builder. It includes a Header Footer Builder, and Ready-to-Use Widgets that you can try for your next website design.
Download RomethemeKit here: RomethemeKit
A CDN (or Content Delivery Network) is similar to a cache where some of your website data is copied and stored for faster delivery. However, you don’t have a cache facility on your own server. Instead, copies of your site’s static files are distributed among a worldwide network of physical machines.
This solution is especially useful for websites that receive traffic from all over the world. Let’s say your primary hosting server is in the US, and a visitor from Australia is trying to access it. Typically, all data has to travel between the server and the visitor’s home, passing through hundreds of routers before appearing on the screen.
With a CDN, the page’s dynamic data still need to make this journey. However, heavy stuff like CSS stylesheets, fonts, images, and client-side scripts can be delivered by servers closer to the user. The less distance data has to travel, the faster it arrives, so with a content delivery network you can reduce the latency of sites around the world and guarantee better performance for everyone, regardless of their physical location.
Not to be confused with the physical machine that hosts your site, a web server is the computer software that receives and processes HTTP requests.
In a normal static website, it reads the request, looks at which files the user’s browser needs to display and sends them back. However, if you use WordPress, the web server must also work with the CMS to deliver dynamically generated content quickly and efficiently.
The default setup with most hosting accounts includes the Apache web server. Apache has been around since the mid-1990s, and it’s been so widely used we won’t be exaggerating if we say that it has played a role in shaping the world wide web as we know it.
Despite its age, it’s still one of the most popular solutions of this kind, and it works well with all popular website-building applications, including WordPress. However, although many providers prefer to stick to it, there are now several Apache alternatives that can significantly boost your site’s performance.
The LiteSpeed web servers are among the top competitors. Unlike Apache, they’re based on an event-driven architecture, allowing them to handle multiple requests under a single process. This means faster speeds without increased server load.
In addition, LiteSpeed has one of the most powerful caching engines in the industry, and you can take full advantage of it if you install the LSCache WordPress plugin. With it, the CMS will be configured to work with the web server and cache the right data at the right time.
Further useful features include advanced DDoS protection and faster PHP processing. The LiteSpeed web servers already support HTTP/3, so once the protocol becomes commonplace, they will start processing static files much more quickly than the competition. HTTP/3 is not universally adopted yet, but having a web server that works with it is a good future-proofing measure.
There are two LiteSpeed web servers:
In addition to all the bells and whistles above, it promises a seamless transition from the default setup because it’s an Apache drop-in replacement. You can install and run it on your account without needing to re-configure or change anything. There is a free plan, though its use is somewhat limited. Subscriptions suitable for working websites start at around $10 per month, and the investment is well worth it if you really value loading speeds.
It’s based on the same event-driven architecture and has the same caching engine. However, some of the additional features are missing, and unlike LiteSpeed Enterprise, it’s not a direct Apache replacement. It can understand .htaccess directives, but you need to restart the web server whenever you make any significant changes to the setup. Be sure to bear this in mind while researching your options.
Images are by far the heaviest part of any web page and take the longest to load. However, websites cannot exist without visuals.
If your images are one of the problems, then there are many solutions for that now. There are many ways or tutorials to optimize the resolution and image quality of your website. Photoshop already offers options such as save for web which compresses the image to provide the highest quality at the smallest possible file size.
Experts recommend converting all images to WebP – a format developed by Google to optimize photos for the web. It supports animation and transparency and can reduce image file sizes by as much as 45%. There hasn’t been much adoption of the format, but almost all modern browsers now support it.
However, since you’re using WordPress, you might prefer to turn all of the hard work over to a plugin. There are dozens of free and premium image optimization add-ons, all promising comprehensive features and noticeable performance boosts. They are known to work, but you will have to go through them yourself and decide which one best suits your needs.
You can reduce the number of simultaneous requests by instructing the server to load only the elements that are visible on the screen.
For example, as soon as a user visits your page, they will see the content at the top. If you ask the server to load images near the footer, you will only increase the number of requests and slow down the site without changing what the user sees. You can configure WordPress to load only the images that are visible on the screen. The rest will be prompted once the user scrolls down.
This technique is called lazy loading, and most websites enable it by default. The functionality was added to the core of WordPress with version 5.5, so as long as your WordPress installation isn’t too slow, lagging should apply.
However, speed and image optimization plugins give you additional options to customize the way your media files load. sometimes, they can help you get more performance out of your site.
Shrinking the volume of data that the server sends can also speed up your website. And one way to do that is to minify your HTML, CSS, and JavaScript files. Let’s explain what this includes.
When developers write code, they leave comments in their files. There is also a lot of empty space between the different sections. These are considered best practices and can become critical during debugging.
Thanks to comments and styling, developers can more easily identify and fix problems in their code. The user’s browser, on the other hand, requires no comments or whitespace. If you remove it, it will render the same page but will do it much faster because the file will be much smaller.
This is the minification process we’re talking about. It’s also quite effective, with a file size reduction of up to 60%. You may be wondering how to implement it on your WordPress site.
You can do this manually by downloading individual files from your server, editing them locally, and uploading them again. However, since you’re using WordPress, your best bet is to turn the hard work over to a plugin.
In the official WordPress repository, you can find many extensions dedicated to minifying your site’s code, and several caching and speed optimization add-ons offer such functionality.
The performance benefits should be immediately apparent, but before you make any changes to the code, remember to back up the original files. This way, if a developer needs to see it at any point in the future, they can find it more easily.
Another method of reducing the volume of data passing between the web server and the user’s computer is to compress your site’s files while they are on the server and let the visitor’s browser decompress the files before displaying them on the screen.
There are many different compression techniques, with GZIP being the most popular in the context of website hosting. All modern browsers support it, and it’s a lossless compression technique, meaning no data is lost when the browser unzips the file. The easiest way to implement GZIP compression on your WordPress site is with a plugin. Again, popular caching and speed optimization add-ons have built-in functionality, and enabling them can reduce your site’s file size by up to 70%. Doing so is well worth considering.
Don’t forget to consider other key factors when selecting your design theme. Performance, for example. Templates with too many high-resolution photos and videos take longer to load than clean designs that rely on a simple background and some text.
Ideally, the theme will offer a clean look with all the applied code and image optimization techniques.
Before you choose a design, it’s a good idea to test the selected candidates in a staging environment and monitor their effect on your site’s loading speed.
Themes and plugins are great for changing your site experience and extending its functionality. However, they do use up storage space and hardware resources when not in use.
Regular plugin audits are the best way to keep your site more secure. The fewer unused add-ons, the less likely someone will find an unpatched vulnerability.
Audits can also help performance. If you see plugins that you don’t use, disable them so they don’t consume hardware resources. If you’re sure you won’t be using it in the future, it’s best to uninstall it altogether.
Website and software updates are important because they apply security patches and introduce new features that make your site more functional. However, many forget that the update also brings stability and performance improvements that can significantly cut your loading times.
Anything from a new PHP version, through a WordPress core update, to a bug fix in one of your plugins can improve site performance and reduce loading times.
However, make sure you approach all updates with caution. New versions of apps and plug-ins can sometimes cause conflicts with other components that power your website and can slow down or even crash your site.
That’s why it’s a good idea to have a working backup before you apply each update. Better yet, consider setting up a staging environment where you can test all new versions and ensure there are no issues before pushing changes to production.
Your WordPress website database contains all your uploaded posts, pages, and other content. It stores your and your users’ comments, profile information, and data generated by plugins.
The more content and features you add and the more popular the website is, the bigger the database will be. The bigger the database, the longer it takes WordPress to find and retrieve the correct information. In other words, it’s important to do some cleaning every once in a while.
The first option is the MySQL OPTIMIZE TABLE statement. You can log in to your server via SSH and run it as a command, though most prefer to use phpMyAdmin, where the option is available in the graphical user interface. These statements reduce the size of the database and increase its efficiency by reorganizing the way data is stored. What it doesn’t do is delete old and unnecessary information.
This includes unapproved and trashed comments, old post revisions, etc. You can do it yourself from the WP dashboard. As we already mentioned, uninstalling unused plugins will also help. In fact, it’s best to run your WordPress site regularly and see what you can do to streamline it.
Another method of optimizing the database is with plugins. Add-ons can automate many of the tasks described above, and usually, all you need to do is click a few buttons. The downside is that they do it automatically and may not delete all unused data. There is also a risk that they may delete things that should have stayed, so make sure you have a backup before proceeding.
Waterfall analysis compares all the requests that the server needs to respond to when the page is loaded. You see the order in which requests are made and how long it takes the server to respond to each request.
You can use your browser’s developer tools to access your site’s waterfall graph or view it on some of the speed testing platforms we mentioned earlier.
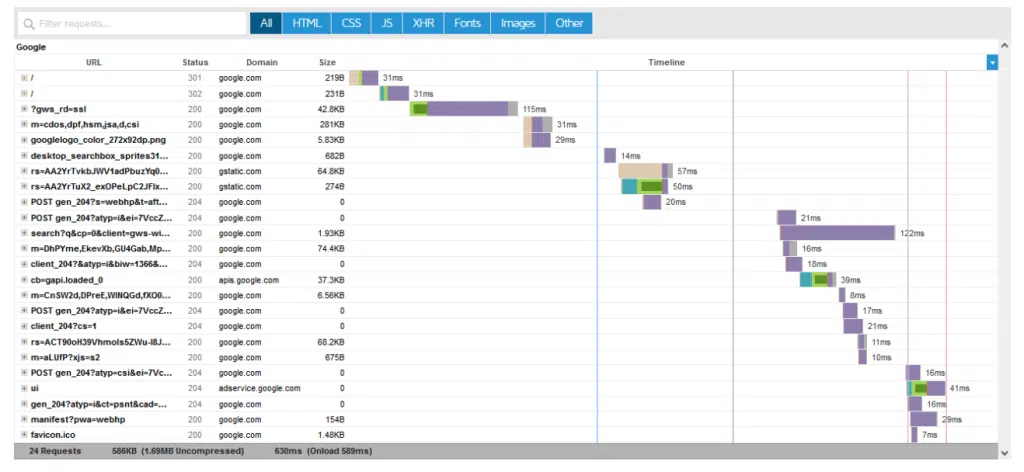
Here, for example, is a GTmetrix waterfall chart for google.com:
You can see each individual request when it was sent, when it was responded to, and how long it took Google to process it.
URLs are listed in the far left column, so you can identify which resource took the longest to load. You can see which components each resource has and determine if you can do anything to increase the loading speed for each request.
If it’s part of a plugin that you don’t use, you can remove it and improve your site’s performance significantly.
You may not be able to handle every slow-loading request on the first try, especially if your web administration experience is limited. You may need to spend some time on Google to determine where the URL is going and what it does.
However, while analyzing a waterfall chart may take some effort, breaking down the information can help you learn more about how your website works and how to improve its performance.
If you have a WordPress blog, your website homepage will display some of your new posts. The more recent posts you display on the page, the more requests the server needs to process. And the more requests, the slower the loading speed.
The solution is simpler than it might seem at first. By reducing the number of blog posts users see on your homepage, you’ll have fewer requests and a faster website. Sometimes, this can be done by clicking a few buttons on the WordPress dashboard.
While doing so, you can also explore other opportunities to organize your visible content. For example, some experts recommend splitting longer blog posts into two or more pages.
Often times when visitors access the site and the data loaded is hosted in your environment, there are important websites that are beyond your control.
For example, some third-party services rely on information hosted on the provider’s infrastructure. So, when a visitor accesses your site, they will not only have to wait for your hosting server but also for a third-party provider. This causes your website to slow down.
The solution is to limit the number of requests that go to places outside your hosting infrastructure. You can start with the waterfall analysis we mentioned earlier and identify third-party URLs.
Once you have done that, you can research how to limit the traffic going to external servers. The most obvious approach is to stop using third-party services, but this isn’t always practical or even possible. For example, marketing tags are critical to understanding how people interact with your site, and often, you’ll need tracking codes from multiple providers to get the full picture.
This usually means running requests to some outside server, which is far from ideal, but if you take the time to do some research you can find a workaround. Google Tag Manager lets you consolidate all your tracking tags under a single container, minimizing your dependence on third-party infrastructure.
Even the best design and most relevant content will not guarantee your site performance if the bounce rate is high, so optimizing your site speed should be your top priority.
Source: WordPress Optimization Tips: 15 Tips for Building a Lightning-Fast Website by Envato
Visit our website to browse our stuff and follow our Instagram for great content!
Website: www.rometheme.net
Instagram: rometheme_studio